Showing posts with label boy's bathroom. Show all posts

Friday, October 1, 2010

oh, we've been busy....

Although I have not had a chance to do much in the way of blog (*cough*sorryaboutthat*cough*)... we have been busy at the Stone Cottage as usual.

We finished painting, staining and shellacking the shelves for the records. And started the tedious process of alphabetizing our collection... still not done...


Speaking for staining and shellacking. To get the stain color right, we had to take a piece of the old trim in to Sherwin Williams and had a color custom mixed. To get the yellow aged look of the shellac, we used Amber Shellac. And it is a super close match to the existing woodwork. Woot! Note: 3 year old Bowie loves Halloween and decorated the mantle all by himself. Future Design Star? Maybe not.


I wasn't digging the Ikea sconces we had put up. They looked too small for the giant fireplace. So I searched and searched for something that blended the line between modern and historic... and found these... I really think they look like a modern Edison-style fixture. And are a more suited to the scale of the fireplace, I think.


I did two coats of ebony stain on Bowie's floor, and a couple coats of clear matte polyurethane. Steven has the floor covered up and we are ready to spray the room down with primer! (Almost done!!!)


In the boys' bathroom, Steven finished the wiring. When I say wiring, I mean he had to install new outlets and fixture boxes, then run electrical from the second floor all the way down to the new breaker box in the basement. Sound like fun? Yeah... ask Steven how much he likes wiring right now!

I picked these plain (cheap) and I think, rather vintage looking, sconces from Home Depot for above the vintage medicine cabinet. Also, you can get a hint of the pale green paint in the bathroom. Think Vintage Spa!


And as if we did not have enough projects all ready... we started in on Emery's loft. See, Emery's room is much smaller than the other two bedrooms upstairs. We decided to give him some more space by tearing out the ceiling and creating a loft in the attic space.
First we had to deal with a strange boxed in area to the right of his windows. This boxed in corner was covering up the portion of the stairway that extends into his room. We decided to create bookcases and cabinet on either side of the window to conceal it. On the right side, the cabinets are not functional (since the stairway is behind it). On the left side, the doors swing open for use as a desk. Between the bookcases, there is a storage bench that I plan to upholster a comfy pillow for.


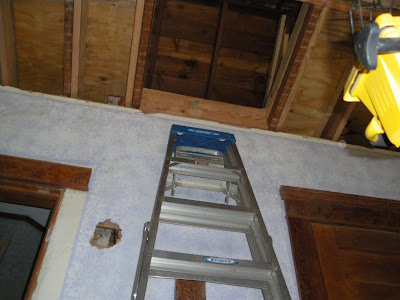
Looking up, you will see we tore out the ceiling. We extended the floor of the attic out a bit to create a "lip" for the loft... this is to give a bit more space and create an area for the ladder to go. (We are planning to use a built-in industrial ladder for loft access).
In the loft, to the right is an area that we plan to put a nightstand and a few small furnishings in. In order to tie in with the plaster walls below, I chose to use regular old house siding. After Steven redid the insulation, of course. It would be impossible to get drywall to look like ancient plaster... and this draws the eye up, I think. There will be trim separating the two where they meet.
This is the left side of the loft. Emery's bed will go on this side. The hole in the wall is where we are putting in access to the attic. (Someday we might need to get to all that electrical!) The boxed in part on the left is the chimney. I would have liked to put the sconce there, but there just was not enough room. It will be going over the attic access.
Here is the view from the loft... We scored antique balcony railing to use for the loft... can't have kiddos trying to parachute their way down or something. (Heaven knows they would try... boys!)


So, there is a little tour of our chaos. Once we get some projects buttoned up, I will be able to post some before and afters... until then, it is time to get messy with some paint!

Friday, July 30, 2010

subway tile and mosaic tile at last!

Quite a bit of progress has been made in the boys' bathroom. We have a floor! Yes, a lovely, finished floor! And a toilet! I under-estimated how unpleasant it would be to share my toilet with four little boys... but I digress...

Keeping in mind the the tiles have to be scrubbed and sealed, here is where we are so far.

After a lot of work, the shower is complete. (This involved pouring a base, forming up sides, rubber membrane, mesh, plastic form thingies, more concrete... I am sure I forgot something in that list. Maybe I am just blocking it out. Sort of like how they say women forget the pain of childbirth?)
I wanted the new bathroom to fit the rest of our 100+ year old house. The mosaic tiles definitely give a vintage feel, but I added little black racing stripes for a fun little zip. A little sealer, and the snow white grout will hopefully stay, well... snow white.
Would you expect anything but subway tiles from me? Again, a little racing stripe to add a bit of interest.
The drywall is sanded, primed and ready for paint. Here is a sneak of the color I chose. It looks a bit washed out with the flash, but it is a pale green. The medicine cabinet is vintage from our local Habitat ReStore.


Next up, cutting out the holes for the ceiling fixtures, painting, installing the wall-mount sink and wall-mount shower. Oh, and trim and baseboards. And curtain hardware. And painting the antique cabinet.

I guess there is still quite a bit to do!

Saturday, July 10, 2010

half-way point in the boys' bathroom

In newer homes, re-doing the bathroom might mean a fresh coat of paint. A new shower curtain. Maybe if you are feeling brave, a some new faucets. (Lucky!)

In old homes, re-doing the bathroom might mean:

Demolition. (Shown in http://cottageofstone.blogspot.com/2010/05/boys-bathroom.html).

Fixing ducting:

Repairing joists and subflooring:


Replacing corroded, leaking old plumbing:


Adding framing to sturdy-up flimsy walls:
Hand new sheet rock and run new electrical to replace knob and tube wiring:
Hang new green board and install cement board for the floor:
And here is where our boys' bathroom is, as of today... Drywall mudded, sanded and ready of primer. Toilet installed (to get the boys out of my bathroom!). First layer of concrete down for the shower floor curing:

Next, the backerboard for the shower wall tile will be installed. A rubber membrane will be installed for the shower floor. More concrete for the shower floor to be poured... eventually tiling will begin.
Stay tuned!

Monday, May 31, 2010

the boy's bathroom

I mentioned in a previous post that I like to show the entire storyline of a project. I give the good, the bad and the ugly. Be prepared for a whole lot of ugly. I consider it all part of the journey in buying and renovating an old home.

You have to have very realistic expectations with older homes. We were lucky with our home in that the stonework on the outside was drop-dead gorgeous. We also had the original woddwork throughout. But that is about where the fairytale ended. Inside, everything was ugly, ugly, ugly. The new home people have an easier job with before and afters. A little bit of paint, and they are good to go.

Old homes? We require months of plaster, electrical, painting, staining, screaming, praying, etc. But the finished product is hopefully worth the work. And we get a bigger sense of pride in a job well done, right?

(This is what we tell ourselves so we don't give up, curl into a little ball and cry.)

Like I said before, get ready for a whole lot of ugly...

The upstairs bathroom is shared by the three oldest boys. The youngest is still taking baths in our bathroom, but the rest like showers. For awhile, we ignored the ugliness of the bathroom. As long as it was functioning, it was not a high priority project.

Now?

Houston... we have a problem...

The bathroom is having some plumbing issues. Somewhere, water was leaking down into the kitchen ceiling. (The previous owners, instead of fixing the issue, drywalled over the damaged plaster in the kitchen). The water was coming through the ceiling and down our cabinets. Not good. We had to act now before we were facing un-repairable damage.

Let's take a short tour...

Behind this door lurks something scary...


Opening the door...

A rusty medicine cabinet. Burgundy-mauve sink.


A matching tub...

Floor to ceiling tile, complete with roses! Just what boys really like!
And a poorly constructed linen closet.

The only part I like is the old-school shower rod that hangs from the ceiling.


This room has officially been tore out. Gutted. Steven began work on the plumbing this week and has found some very serious issues. Of course, the project is not as simple as we hoped it would be. He has to remove a great deal of old corroded plumbing.
And I should add that I underestimated how fun it would be to share my bathroom with 4 little boys. Yuck.
The boys, however, are excited about their new bathroom project. Everything has been purchased and is awaiting installation... once Daddy gets all that plumbing figured out. We are prepared to hear a lot of colorful language over the next week. Yikes!