Friday, October 1, 2010

oh, we've been busy....

Although I have not had a chance to do much in the way of blog (*cough*sorryaboutthat*cough*)... we have been busy at the Stone Cottage as usual.

We finished painting, staining and shellacking the shelves for the records. And started the tedious process of alphabetizing our collection... still not done...


Speaking for staining and shellacking. To get the stain color right, we had to take a piece of the old trim in to Sherwin Williams and had a color custom mixed. To get the yellow aged look of the shellac, we used Amber Shellac. And it is a super close match to the existing woodwork. Woot! Note: 3 year old Bowie loves Halloween and decorated the mantle all by himself. Future Design Star? Maybe not.


I wasn't digging the Ikea sconces we had put up. They looked too small for the giant fireplace. So I searched and searched for something that blended the line between modern and historic... and found these... I really think they look like a modern Edison-style fixture. And are a more suited to the scale of the fireplace, I think.


I did two coats of ebony stain on Bowie's floor, and a couple coats of clear matte polyurethane. Steven has the floor covered up and we are ready to spray the room down with primer! (Almost done!!!)


In the boys' bathroom, Steven finished the wiring. When I say wiring, I mean he had to install new outlets and fixture boxes, then run electrical from the second floor all the way down to the new breaker box in the basement. Sound like fun? Yeah... ask Steven how much he likes wiring right now!

I picked these plain (cheap) and I think, rather vintage looking, sconces from Home Depot for above the vintage medicine cabinet. Also, you can get a hint of the pale green paint in the bathroom. Think Vintage Spa!


And as if we did not have enough projects all ready... we started in on Emery's loft. See, Emery's room is much smaller than the other two bedrooms upstairs. We decided to give him some more space by tearing out the ceiling and creating a loft in the attic space.
First we had to deal with a strange boxed in area to the right of his windows. This boxed in corner was covering up the portion of the stairway that extends into his room. We decided to create bookcases and cabinet on either side of the window to conceal it. On the right side, the cabinets are not functional (since the stairway is behind it). On the left side, the doors swing open for use as a desk. Between the bookcases, there is a storage bench that I plan to upholster a comfy pillow for.


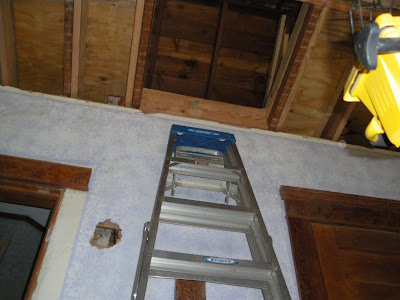
Looking up, you will see we tore out the ceiling. We extended the floor of the attic out a bit to create a "lip" for the loft... this is to give a bit more space and create an area for the ladder to go. (We are planning to use a built-in industrial ladder for loft access).
In the loft, to the right is an area that we plan to put a nightstand and a few small furnishings in. In order to tie in with the plaster walls below, I chose to use regular old house siding. After Steven redid the insulation, of course. It would be impossible to get drywall to look like ancient plaster... and this draws the eye up, I think. There will be trim separating the two where they meet.
This is the left side of the loft. Emery's bed will go on this side. The hole in the wall is where we are putting in access to the attic. (Someday we might need to get to all that electrical!) The boxed in part on the left is the chimney. I would have liked to put the sconce there, but there just was not enough room. It will be going over the attic access.
Here is the view from the loft... We scored antique balcony railing to use for the loft... can't have kiddos trying to parachute their way down or something. (Heaven knows they would try... boys!)


So, there is a little tour of our chaos. Once we get some projects buttoned up, I will be able to post some before and afters... until then, it is time to get messy with some paint!

Friday, August 6, 2010

sewing curtains for the Airstream


I thought I would share a quick guide on sewing curtains for the Airstream. Browsing around the Airstream forums, many people seem a bit intimidated by the process of sewing curtains. It is actually quite easy, although a bit time-consuming. But, with some simple tools, you can whip up some nice new curtains and save some cash!

First things first, pick out some fabric. As I posted earlier, I wanted something that screamed "Flower Power!" and matched our Tiffany Box Blue interior. We needed 10 yards for our curtains since the fabric I chose was a 45" wide bolt. For linings, I found some super-cheap white muslin.

I measured out all the old curtains. I added two inches for the top and bottom, and one inch per side for seam allowances. To make sure my curtains were shaped like a rectangle and not a rhombus, I like to cut my fabric using a self-healing cutting mat and rotary cutter. You can find a three piece set (includes the handy ruler) in the quilting section of the craft store.


After cutting your curtain and liner fabrics to size, I like to press my seams. Some people skip this step and rely only on pinning, but pressing everything flat gives a nice crisp edge and makes it easier to sew and put in the eyelets later.


After I press all my folds, I put in the eyelets. (If you choose to put in eyelets, you have to do so before sewing the bottom edge down). The old curtains in my Airstream simply had the pointed curtains hooks poked into the fabric. The curtain hooks have sharp points that easily tear through the fabric, but I think putting an eyelet in is a nicer touch. You can pick up a grommet tool and bag of eyelets very inexpensively. The first step is using the tool to create a small hole in the fabric, much like a hole punch. I used the same 4" increments that my old curtains had.


Next, you thread the eyelet into the hole and use the tool to crimp it down. It gives a professional look, I think.


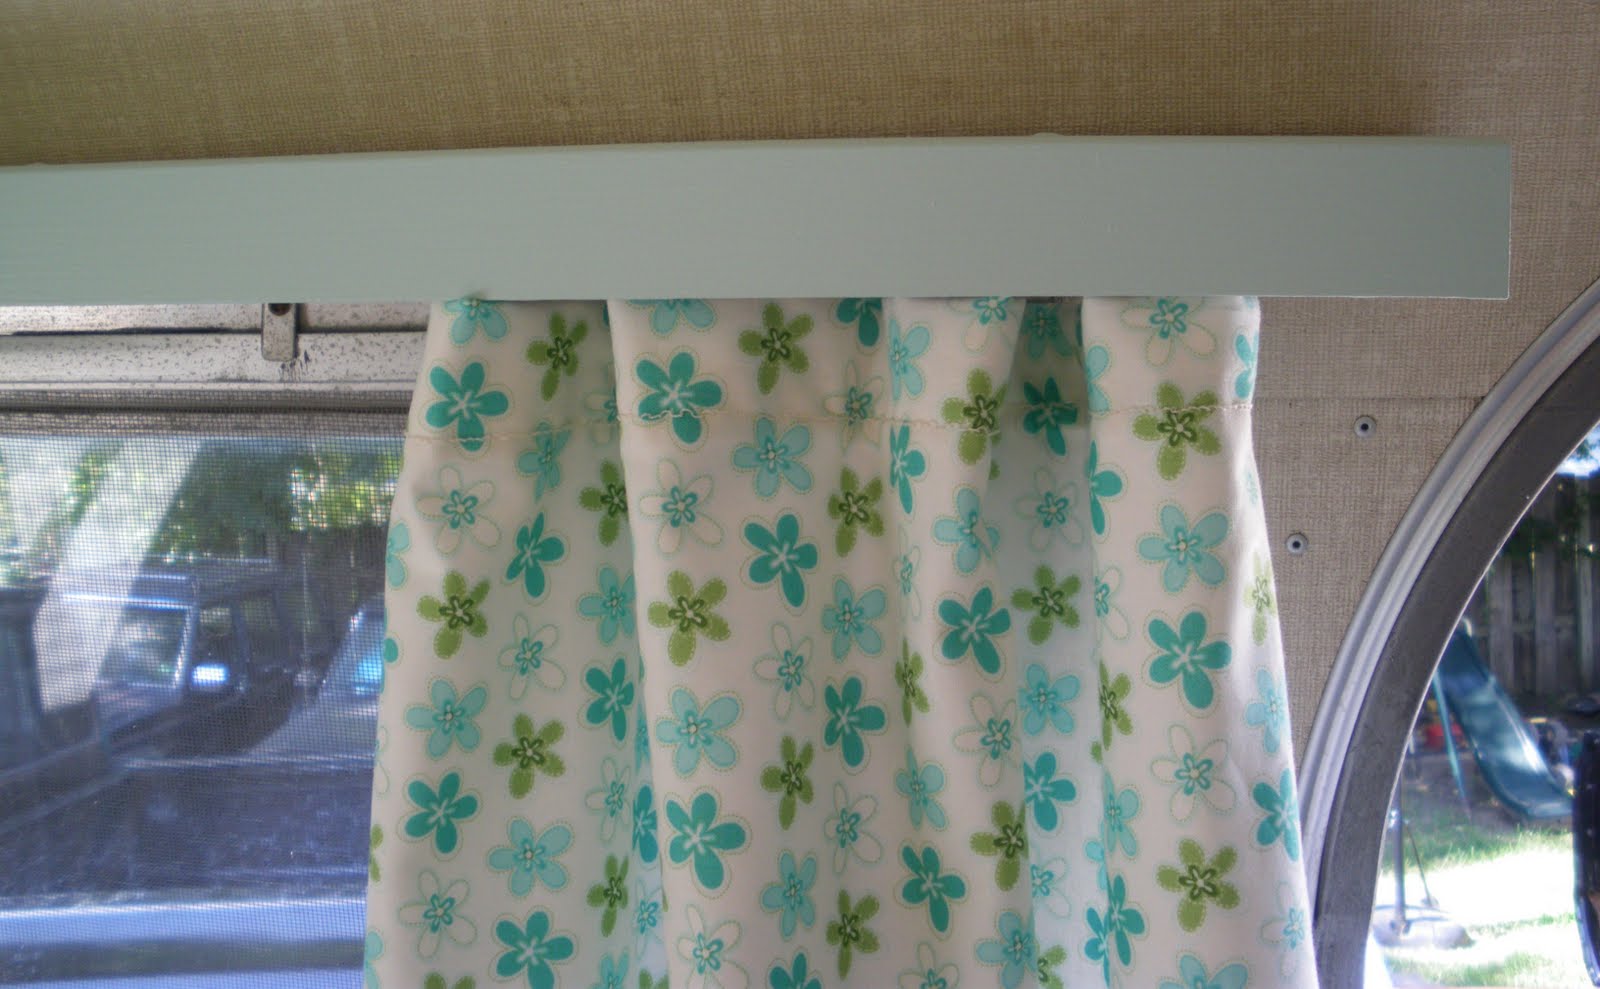
Next, just sew down all your edges. I fold the sides over twice to hide any rough edges (see picture below). I pin everything in place to keep everything tidy as I sew.


This is a time consuming process. I like to set up a folding table in the living room so that I can watch a movie while I work... it passes the time. On this night, I was watching Pretty In Pink.


The final step is to secure the little rings at the bottom of the curtains. My Airstream had fishing line run across the bottom of the windows to hold the curtains down. (I think plain white cord might be a nicer touch). I simply hand stitched these on in the same 4" increments as the eyelets.
And, voila, you are ready to hang your new curtains.


I think they look really sweet when all bunched up to the side. I like to let the sunlight in! You could use a light-blocking material, but I really like the look of light streaming in. I also think the curtains look really nice with the newly painted cornices!


Whew! One down... seven to go!

Saturday, July 31, 2010

color scheme for the Airstream

With all my design-related projects, I always create a project board (or mood board) to help me visualize. I find it helpful to have a plan of action when selecting paints, fabrics and such... it also saves from making expensive mistakes! Our Airstream project also required some design planning.

Our Airstream has the "International" trim package. This gave us a really pretty color scheme to work with. The bathroom is a perfect "Tiffany Box Blue." (Of course, the aqua and turquoise are what sealed the deal for me!)

I tested all my paint and fabric choices against the kitchen counter and the bathroom shower walls. All my color choices had to not only match the color scheme, but the retro feel. I felt everything should have the "Flower Power" feel.


paint, laminate and vinyl swatches against the kitchen counter


I purchased fabrics for the curtains and throw pillows from my favorite fabric store, Sarah's Fabrics, in Lawrence, Kansas. For the curtains, I will use "Bloom & Grow" by Mind's Eye (far right). For the throw pillows, two prints from "My Happy Garden" by Cloud9 Fabrics, and "Spa" by Rosemarie Lavin (left to right).


The dinette table is a "wood" laminate. I am not wild about fake plastic wood. I chose a very retro "Aqua Boomerang" by Formica. We will bind the edges with silver chrome.

For the floor, I chose Azrock's Cortina tile squares in "Spearmint." This will be used throughout the camper as I want kid-friendly clean-up!


For the cabinetry, I chose Martha Stewart's "Vintage Map." For the built-in beds / sofas, I chose "Chamois Cloth." (Both of these are from the discontinued line at Lowe's, but you might be able to have them mix them.)


I also started purchasing vintage accessories for Eleanor... turquoise melamine dishes, canisters, etc. I honestly cannot wait to go camping!

Friday, July 30, 2010

Our new addition: Eleanor

As if we didn't already have a *few* projects going on, we now have another. This one is a bit more recreational. With our crew of boys, I thought it would be fun to go camping. I commented to Steven about how pretty I thought Airstream campers are. Quicker than you could say "have-you-lost-your-mind?" we were perusing Craigslist for vintage Airstreams. (Craigslist for the win!)


And here is what followed us home. Literally. Meet "Eleanor." Our 1967 Airstream Safari.
Immediately, I started working on the details. Ripping up the grubby carpet, painting the dingy-white cabinets, new upholstery... It is all in the works. And I swear this will be a quick project. Just a small one. And we will camp really soon. Really!
Emery and Satchel helped me with the cleaning. Emery armed with a shop vac and Satchel with a sponge and cleaner, we got her cleaned from top to bottom. The orange curtains and lime green cushions? Not staying.

The grungy (not original) carpet was ripped out as well as the (not original) vinyl in the bathroom.


All ready for priming!


All clear on this side, too.


The only part I find really scary: the bathroom. Maybe I will make Steven do this part!


subway tile and mosaic tile at last!

Quite a bit of progress has been made in the boys' bathroom. We have a floor! Yes, a lovely, finished floor! And a toilet! I under-estimated how unpleasant it would be to share my toilet with four little boys... but I digress...

Keeping in mind the the tiles have to be scrubbed and sealed, here is where we are so far.

After a lot of work, the shower is complete. (This involved pouring a base, forming up sides, rubber membrane, mesh, plastic form thingies, more concrete... I am sure I forgot something in that list. Maybe I am just blocking it out. Sort of like how they say women forget the pain of childbirth?)
I wanted the new bathroom to fit the rest of our 100+ year old house. The mosaic tiles definitely give a vintage feel, but I added little black racing stripes for a fun little zip. A little sealer, and the snow white grout will hopefully stay, well... snow white.
Would you expect anything but subway tiles from me? Again, a little racing stripe to add a bit of interest.
The drywall is sanded, primed and ready for paint. Here is a sneak of the color I chose. It looks a bit washed out with the flash, but it is a pale green. The medicine cabinet is vintage from our local Habitat ReStore.


Next up, cutting out the holes for the ceiling fixtures, painting, installing the wall-mount sink and wall-mount shower. Oh, and trim and baseboards. And curtain hardware. And painting the antique cabinet.

I guess there is still quite a bit to do!

Monday, July 12, 2010

fireplace re-do part seven: ready for stain

The fireplace is ready for staining! Steven finished all the painting. (Everything looks quite nice in our creamy white paint). I cannot even believe this is the same fireplace. I think the before and after for the finished product will be quite dramatic!


After running through several packages of sandpaper, the wood is ready to be conditioned, stained and sealed.


The brick of the fireplace was not intended to be visible... whoever laid the bricks slopped mortar everywhere. It was oozing through the bricks. Steven spent a lot of time with the grinder cleaning it up. The Dremel wouldn't even make a dent in it. He actually had to take our grinder to it... It was pretty crazy! He had to set up a board in the living room to keep the sparks contained. Our living room was coated in dust, so it was a pretty messy ordeal. But, a couple coats of primer and paint later, and we have this lovely brick fireplace:


Of course, every project we embark on hits a snag. The woodwork in our living room doesn't match. It has all aged differently... The doors and trim have gotten a lot of sunlight of the years and have faded to a medium brown:


While the beams on the ceiling, and the trim around the windows have remained a deep red-brown:

So we are doing a few different test pieces for comparison. I think that the pocket door is the biggest area of woodwork and the doors are nearest the fireplace, so we should match those. We will try 3 different options: a deep red, a medium brown, and a medium brown mix with red.

Old houses keep us creative, right?

Saturday, July 10, 2010

half-way point in the boys' bathroom

In newer homes, re-doing the bathroom might mean a fresh coat of paint. A new shower curtain. Maybe if you are feeling brave, a some new faucets. (Lucky!)

In old homes, re-doing the bathroom might mean:

Demolition. (Shown in http://cottageofstone.blogspot.com/2010/05/boys-bathroom.html).

Fixing ducting:

Repairing joists and subflooring:


Replacing corroded, leaking old plumbing:


Adding framing to sturdy-up flimsy walls:
Hand new sheet rock and run new electrical to replace knob and tube wiring:
Hang new green board and install cement board for the floor:
And here is where our boys' bathroom is, as of today... Drywall mudded, sanded and ready of primer. Toilet installed (to get the boys out of my bathroom!). First layer of concrete down for the shower floor curing:

Next, the backerboard for the shower wall tile will be installed. A rubber membrane will be installed for the shower floor. More concrete for the shower floor to be poured... eventually tiling will begin.
Stay tuned!

bowie's new (old) floor

I think every owner of an older home knows about the "hardwood floor dance." The hardwood floor dance occurs at a very special time... You begin by pulling up a corner of nasty, stained, musty carpeting. You get a little peek of wooden loveliness under it. You do a preliminary squeal of joy. It is a bit precautionary at this point. You are not sure what lurks beneath the rest of the carpet. After hour upon hour of pulling up gross carpeting and pad, and removing tack strips and staples with a pair of vise gripes and a flat head screwdriver, you finally get to see the big picture. Hopefully the floor revealed is under repairable condition... This is when you bust out the "hardwood floor dance."

Enjoy the "hardwood floor dance" while you can. Because soon, the realization of more hours of hard work sets in. This begins the "dust everywhere from sanding" and "sore knees from crawling around the floor with a paint brush" phases.

In Bowie's room, I am now one coat of matte-finish polyurethane away from a finished floor. (JOY!!!)

While planning the color scheme for Bowie's room, I knew right away I wanted to do a dark floor. I think Steven might have died a little on the inside when I picked the "Ebony" stain from Home Depot. In my mind, I see pale blue walls and a deep, dark floor. Steven wasn't on board with the idea. And while the stain was wet, it was VERY VERY DARK. But after two coats of stain, I got the rich, deep color I wanted, yet you can still see the grain of the wood. I also got a nice patina-look due to the variation of the oak. It doesn't look like a fresh, new floor. It looks like it could have been original to the house, if they did actually have ebony stain in the early 1900s. Which they did not.

Freshly sanded and scrubbed with TSP-substitute:
Two coats of Ebony oil-based stain and two coats of matte polyurethane later:


It is a difficult floor to photograph, but in person is quite lovely. One more coat of poly, and some time to dry, and I will begin covering the floor with protective butcher paper for the priming of the walls!

Monday, May 31, 2010

the boy's bathroom

I mentioned in a previous post that I like to show the entire storyline of a project. I give the good, the bad and the ugly. Be prepared for a whole lot of ugly. I consider it all part of the journey in buying and renovating an old home.

You have to have very realistic expectations with older homes. We were lucky with our home in that the stonework on the outside was drop-dead gorgeous. We also had the original woddwork throughout. But that is about where the fairytale ended. Inside, everything was ugly, ugly, ugly. The new home people have an easier job with before and afters. A little bit of paint, and they are good to go.

Old homes? We require months of plaster, electrical, painting, staining, screaming, praying, etc. But the finished product is hopefully worth the work. And we get a bigger sense of pride in a job well done, right?

(This is what we tell ourselves so we don't give up, curl into a little ball and cry.)

Like I said before, get ready for a whole lot of ugly...

The upstairs bathroom is shared by the three oldest boys. The youngest is still taking baths in our bathroom, but the rest like showers. For awhile, we ignored the ugliness of the bathroom. As long as it was functioning, it was not a high priority project.

Now?

Houston... we have a problem...

The bathroom is having some plumbing issues. Somewhere, water was leaking down into the kitchen ceiling. (The previous owners, instead of fixing the issue, drywalled over the damaged plaster in the kitchen). The water was coming through the ceiling and down our cabinets. Not good. We had to act now before we were facing un-repairable damage.

Let's take a short tour...

Behind this door lurks something scary...


Opening the door...

A rusty medicine cabinet. Burgundy-mauve sink.


A matching tub...

Floor to ceiling tile, complete with roses! Just what boys really like!
And a poorly constructed linen closet.

The only part I like is the old-school shower rod that hangs from the ceiling.


This room has officially been tore out. Gutted. Steven began work on the plumbing this week and has found some very serious issues. Of course, the project is not as simple as we hoped it would be. He has to remove a great deal of old corroded plumbing.
And I should add that I underestimated how fun it would be to share my bathroom with 4 little boys. Yuck.
The boys, however, are excited about their new bathroom project. Everything has been purchased and is awaiting installation... once Daddy gets all that plumbing figured out. We are prepared to hear a lot of colorful language over the next week. Yikes!