We finished painting, staining and shellacking the shelves for the records. And started the tedious process of alphabetizing our collection... still not done...

Speaking for staining and shellacking. To get the stain color right, we had to take a piece of the old trim in to Sherwin Williams and had a color custom mixed. To get the yellow aged look of the shellac, we used Amber Shellac. And it is a super close match to the existing woodwork. Woot! Note: 3 year old Bowie loves Halloween and decorated the mantle all by himself. Future Design Star? Maybe not.

I wasn't digging the Ikea sconces we had put up. They looked too small for the giant fireplace. So I searched and searched for something that blended the line between modern and historic... and found these... I really think they look like a modern Edison-style fixture. And are a more suited to the scale of the fireplace, I think.

I did two coats of ebony stain on Bowie's floor, and a couple coats of clear matte polyurethane. Steven has the floor covered up and we are ready to spray the room down with primer! (Almost done!!!)

In the boys' bathroom, Steven finished the wiring. When I say wiring, I mean he had to install new outlets and fixture boxes, then run electrical from the second floor all the way down to the new breaker box in the basement. Sound like fun? Yeah... ask Steven how much he likes wiring right now!

I picked these plain (cheap) and I think, rather vintage looking, sconces from Home Depot for above the vintage medicine cabinet. Also, you can get a hint of the pale green paint in the bathroom. Think Vintage Spa!

And as if we did not have enough projects all ready... we started in on Emery's loft. See, Emery's room is much smaller than the other two bedrooms upstairs. We decided to give him some more space by tearing out the ceiling and creating a loft in the attic space.
First we had to deal with a strange boxed in area to the right of his windows. This boxed in corner was covering up the portion of the stairway that extends into his room. We decided to create bookcases and cabinet on either side of the window to conceal it. On the right side, the cabinets are not functional (since the stairway is behind it). On the left side, the doors swing open for use as a desk. Between the bookcases, there is a storage bench that I plan to upholster a comfy pillow for.

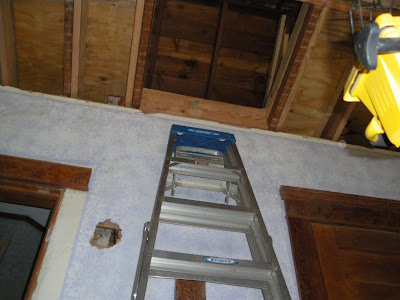
Looking up, you will see we tore out the ceiling. We extended the floor of the attic out a bit to create a "lip" for the loft... this is to give a bit more space and create an area for the ladder to go. (We are planning to use a built-in industrial ladder for loft access).
Looking up, you will see we tore out the ceiling. We extended the floor of the attic out a bit to create a "lip" for the loft... this is to give a bit more space and create an area for the ladder to go. (We are planning to use a built-in industrial ladder for loft access).
In the loft, to the right is an area that we plan to put a nightstand and a few small furnishings in. In order to tie in with the plaster walls below, I chose to use regular old house siding. After Steven redid the insulation, of course. It would be impossible to get drywall to look like ancient plaster... and this draws the eye up, I think. There will be trim separating the two where they meet.

This is the left side of the loft. Emery's bed will go on this side. The hole in the wall is where we are putting in access to the attic. (Someday we might need to get to all that electrical!) The boxed in part on the left is the chimney. I would have liked to put the sconce there, but there just was not enough room. It will be going over the attic access.

Here is the view from the loft... We scored antique balcony railing to use for the loft... can't have kiddos trying to parachute their way down or something. (Heaven knows they would try... boys!)

So, there is a little tour of our chaos. Once we get some projects buttoned up, I will be able to post some before and afters... until then, it is time to get messy with some paint!