Exciting news at the Cottage of Stone... we made a trip to Home Depot and bought our first round of supplies for the war-zone master bathroom! Steven is finishing the demo right now as I type. What a trooper. But soon I will have progress pictures, and some step-by-step DIY information on:
installing and finishing a white oak floor from Lumber Liquidators (I know, I know... you think I am crazy for putting a hardwood floor in a bathroom. Really, I have a PLAN. Trust me! It will be painted a gorgeous spa color and sealed water tight like a dolphin's butt.)
installing victorian baseboard (mitering is easier than it looks!)
moving existing toilet set-up and installing a new toilet (we bought a flapperless Pegasus toilet called "Cottage Collection" - how perfect!)
moving existing water lines and installing a pedestal sink (we bought the matching Pegasus pedestal sink from the "Cottage Collection)
installing new sink faucets (again, a Pegasus product)
A later Phase II will include a installing a restored clawfoot tub and freestanding shower enclosure, but for now, we are keeping the apron-front tub. We elected to leave up the cheap shower panels and not do subway tile since it would all be riped out when we do the clawfoot anyway. Hopefully, the clawfoot will be in a month or two.
Stay tuned for pictures!
Saturday, January 31, 2009
Thursday, January 29, 2009
our bathroom went from blah to war zone!
It started with a simple, “Oh, honey... I want to fix up the bathroom. Can you pull up the vinyl so that I can seal and paint the floor. Then I will just paint the walls and trim, make a curtain, and it'll be done.”
HA! What was I thinking? I have seen the previous owners' other handywork. Was I delusional or smoking crack?

Steven goes in, pry bar in hand, and pulls out the cheap trim someone lovingly installed with huge staples. Yes. Staples. Not finish nails, but staples. Then he starts pulling up the cheapo vinyl flooring. I made a run to the hardware store for a new wax ring for the toilet since he had to put that off to the side. He pulls up the vinyl, and GROSS! There is a nasty, moldy, water-damaged sheet of subfloor.


Steven goes to work prying up the next layer of vinyl and it is tougher work. (Some cursing about staples could be heard at this point.) After that was up, there was more rotten subfloor. (More staples!!) Under that subfloor was the original 1 x 2 hardwood floors (like in our bedroom) were so rotten they were black. Finally, under that, the 1 x 12 planks that the old-timers used for subfloor.

HA! What was I thinking? I have seen the previous owners' other handywork. Was I delusional or smoking crack?
Steven goes in, pry bar in hand, and pulls out the cheap trim someone lovingly installed with huge staples. Yes. Staples. Not finish nails, but staples. Then he starts pulling up the cheapo vinyl flooring. I made a run to the hardware store for a new wax ring for the toilet since he had to put that off to the side. He pulls up the vinyl, and GROSS! There is a nasty, moldy, water-damaged sheet of subfloor.

We decide it is good to have discovered the water damage and press on. Steven pulls out the moldy plywood and we discover quite possibly the ugliest vinyl under that. And the water damage around the toilet and apron-front tub is getting worse. The original lead toilet fitting is exposed and he pulls that out for replacement. (My cheap painting project is getting a bit more expensive.)
Steven goes to work prying up the next layer of vinyl and it is tougher work. (Some cursing about staples could be heard at this point.) After that was up, there was more rotten subfloor. (More staples!!) Under that subfloor was the original 1 x 2 hardwood floors (like in our bedroom) were so rotten they were black. Finally, under that, the 1 x 12 planks that the old-timers used for subfloor.
Steven gets the “Husband of the Year” award now. What was a simple job turned mega. And he never complains. :)So, on my list now... figure out a new floor (painted wood like I originally planned or somehow, some super cheap tile). If we have to remove the tub to repair the entire floor, which I think is what Steven wants, a new tub surround. The list grows. Our bathroom looks worse, but will soon be better. I hope.

P.S.

P.S.
I have no toilet now. I will have to brave the boys' toilet upstairs until this is fixed. Scary!!!
dreamy dreamy bathrooms
 I have begun a quick project in my master bath.. again, an interim step... Just some paint and fabrics to spruce the place up until I can do the full blown restoration with a clawfoot tub, hex tile, highboy toilet, etc etc etc.
Until then, I will daydream. Here are some nice bathrooms to sigh about. Bring on the bubble bath! Look at the ceiling in the one above... perfect! And the shaving mirror is something I definitely want to do.

The walls in this bathroom remind me of my bedroom... only I have painted my walls the palest pink (which is pictured in my master bedroom thread). I also think that little plant stand would be so cute if it had a few little apothecary jars on it. Wouldn't it pop with pink or aqua jars? But this all white bathroom is dreamy as it is... I dream of clawfoot tubs. And there is so much texture here even with a monochromatic look.

This one has a bit more color, although still a cool and light look. I love the pale gray walls, the beigey subway tile... and the little distressed cabinet is great. I wish my bathroom were big enough for a chair. (When I told Steven that, he jokingly said it DOES have a chair. I don't think the toilet counts!)
 I love the black legs on the tub. And the littlest splashes of floral make it seem a bit more liveable. Don't get me wrong, I love that all-white look. It isn't at all sterile to me... but it seems like it would be a pain to keep spotless. And with white, it really does have to be spotless.
A paneled side tub... not claw foot, but pretty! And the floral wallpaper is beautiful. I have to wonder how it holds up with humidity since I love scathing hot showers that fog everything up.

Look at the feet on the tub! Gorgeous!! Although it is white, it has the palest pink look, doesn't it? I also love the fixture - I must have a shower for mine, but the handshower is darling.

Not everything is pink for me, OK? Here is one with blue toile. Again, a gorgeous chair! And can you imagine the luxury of a fireplace in your bathroom??? My bathroom right now is frigid. Really. Glassblock is not a good window in the Kansas winter. Brrrrrr!

I love the "relax" over the tub. I think if it had a huge fluffy flokati rug in front of the tub, I would melt into the room. It is so pretty. Maybe a bit sparse.
 Wild wallpaper!! I wouldn't do it in my house -- but it is amazing!
 I love the armoire... so charming! Again, I need a huge bathroom. Mine is tiny! My house is a Sunday house, so it certainly was not built extravagently with huge baths.
 OK... washbasin? gorgeous. basin stand? gorgeous. beadboard? gorgeous.
 Again, I love those handshowers... And the palest pink look to the tub. Just lovely.
Did you get any ideas for your space?
Wednesday, January 28, 2009
question for designers: how do you hang artwork on blank walls?
I have been busily sketching out a few of the rooms in the Cottage of Stone. I am old school that way - no software for me, I like the organic quality of putting pencil to paper. (This from the IT expert!) It is like rolling up your sleeves and putting your fingers in the soil while gardening. Bliss!
I am working on pulling the furniture away from the walls in the living room and maintaining the conversational feel of my furniture. And it looks super great! Except for one problem... how do you hang your art work?
OK, so I get if I have a table against the wall, it is easy to put a nice vase and some candlesticks on the table, and hang the artwork over the table. Or if you sofa is pushed up against the wall, hang "sofa paintings" over it. They make it easy for us huh? They even call them "sofa paintings."
But what do you do when you don't have furniture against your walls? Just hang the artwork as you wish and hope it doesn't look like it is hanging randomly like in a gallery? You don't have furniture to anchor it down anymore... so what do you do?
Seriously designers... chime in here. How do you hang artwork on big walls without furniture to tie it in??
Tuesday, January 27, 2009
can you guess what color I will be painting my trim?


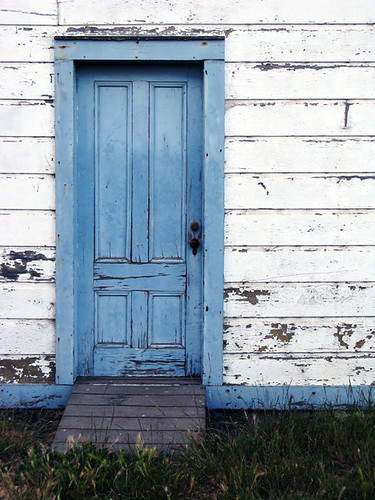


once the weather warms up, i will be bravely climbing the ladder to paint all the trim a dreamy blue. our front door is original to the house (and has the original huge glass pane in it), so i doubt Steven will agree to me painting the door... but robins egg blue trim should look great against the kansas sandstone!
Puck's favorite blogs, part one
Today, I thought I would take the time to share some beautiful images from some of the other blogs I frequent. There are some really great bloggers out there, and I thought it would be nice to share some of their work with you. Here is the first installment...
 I love the soft whites in her house... but these pink flowers just pop. So pretty.
 I could cozy up for a nap here...
 Or a nap here... (might I mention it is freezing and snowing in Kansas right now!)
 If she finds a strange woman in her bathtub... I hope she doesn't call the police... it's just me.
 I am completely jealous of you all who can get away with white. My woodwork is dark and I gave kids... see the little bit of pink in the background. LOVE IT!
 I love-love-love her hot pink sofa. The perfect spot to read my magazines!
 I adore these chairs from one of her clients' houses. The ticking is a favorite of mine. (And the little pink arrangement on the table!)
 Doesn't his living room look festival, warm and cozy?

Tiny little apothecary jars as bud vases. Good work, Artie!
A Beach Cottage
This is a blog done by a English woman transplanted to Australia. I am so envious as it is my dream to even visit Australia, let alone live there. I am just enamored with her beach cottage.
I love the soft whites in her house... but these pink flowers just pop. So pretty. I could cozy up for a nap here...Absolutely Beautiful Things
She is an interior designer from Brisbane, Australia... a definite Aussie theme going here, huh? And she seems to love pink as much as I do!
I am completely jealous of you all who can get away with white. My woodwork is dark and I gave kids... see the little bit of pink in the background. LOVE IT! I love-love-love her hot pink sofa. The perfect spot to read my magazines! I adore these chairs from one of her clients' houses. The ticking is a favorite of mine. (And the little pink arrangement on the table!)Color Outside the Lines
Artie lives in New York in a bungalow - and his living room looks a lot like mine, as far as color and wood work go...
Doesn't his living room look festival, warm and cozy?Tiny little apothecary jars as bud vases. Good work, Artie!

Artie's room all look so warm and cozy... like I would want to hibernate in there on a cold winter day. (Whereas, the white rooms all look cool and breezy, like a good summer cat-nap.)
OK... more bloggy-goodness later. I am off to try to make my bedroom (the only room in the house that does have white trim) look breezy and pretty... I would spray my kitchen chairs and table, but it is snowing outside and won't be warm enough to paint until this weekend.
Monday, January 26, 2009
Kitchen, In-Progress Sneak Preview!

No, it isn't your eyes... there is a space of yellow left under the cabinets. This area will be covered by beadboard this week, so I didn't bother to paint it.
There is still quite a bit to be done with the kitchen:
Install beadboard under cabinets & paint (wall color or trim color? hmmm...)
Paint floor dark charcoal gray
Touch-up trim work
Finish organizing cabinets
Put out accessories
Spray table and chairs gloss black
Recover chairs and stools with pink fabric
Here is what we have done so far!

The table is still in the middle of the floor in this picture since the door was just painted. Here you can see all the cabinets that I took the doors off of. I have started putting out the dishes and what not... but most of that will be "finishing details."

Here is the other side of the room. This includes the weird slanted island that the cooktops and griddle are on. We did a nice "copper" backsplash here from those new vinyl tiles that look like tin ceiling tiles. I will post more pictures of that later on. To the left are the convection wall ovens. I do like the appliances, but they are so dated. I guess they are from the early 80s.
 The other side of the room again. Someday that door that leads to the back porch (which will one day be my studio/office) will be a dutch door.
  Here is a lesson in why you have to be super careful around old windows. Our house has the original windows, with the ropes and weights. We actually have two sets of windows per window. Hard to explain. Instead of one window that opens and closes, we have to open two windows, an inner and an outer window. Which I supppose keeps the cold out. Steven is now really thankful we have these double windows. There was a package of old hamburger buns in his way, and he sort of chucked them over his shoulder toward the counter here (the garbage can is built into the lower cabinet to the left of the dishwasher). The buns were not even hard, but they hit the window and broke the window! I guess old glass really is brittle! So he is busy replacing the glass in the window. (Good thing I have little hands, because I had to reach into the wall to fish out the rope for the window weights.) You can see in this picture that the outer window is still in tact, but the inner one is waiting for new glass.
 Sunday, January 25, 2009
Trial and Error
 Sneak Peek!
I have been working on finishing up the paint in the kitchen. One area I am proud of is the "door that goes to no where." Well... actually, it is a door in the kitchen that goes into my walk-through closet into the master bedroom. It was probably once a butler's pantry (which includes our laundry shoot that goes from the 2nd floor into the basement), but it is now my walk-through closet. I think I like it so much that even after our renovation later, we probably will keep it and not cover it up. Although we don't use the door anymore (and it before was blocked by the Hoosier cabinet), it looks so charming now, I think.
The door was painted the wall color (Country Dairy), and the trim the trim/upper cabinet color (Picket Fence White), both by Ralph Lauren. We painted replaced the knob with an ebony porcelein knob we rescued from a house that was being demolished, and Steven sprayed the doorplate flat black. To add a little detail, I handpainted words in the center of each door panel (one through five) in Black Truffles by Ralph Lauren. In the recess of the panels, I painted the lower cabinet color, my own creation, Bunny Gray.
Now here is the trial and error part... Just to see if I liked it, I painted the edges of the panels in Black Truffle. I did like it, but I decided that it looked a bit over-worked and the black paint lost the nice detailing of the routing. You couldn't see the edges anymore. So I edited a bit, and covered the black back up with the main color.
I painted the top of the table in a custom color I created by mixing some of the black paint in to the Bunny Gray and it was nice... then the next morning, I came into find the three-year-old had ran a hot wheels car all over the table top and made a big scratch in it. I decided to just repaint it all in Bunny Gray. The chairs and table base will be sprayed in Gloss Black. I also made little placements for the boys, personalized for each boy, that I will show you in a later post... so cute! Anyway, we scooted the fridge and Hoosier to the left, and moved the table where the Hoosier used to be, and this made more room so I could have all 4 chairs around the table. (You can see the Hoosier cabinet to the left of the table in the top picture.)
This area will give you a bit of a sneak peak at the colors I chose for the kitchen!
 You can see the black edging I decided to paint over again around the "two" panel.
 I decided it was a simpler look without the black border.
 Thursday, January 22, 2009
and kitchen inspiration for my future dream kitchen...
Some day we will have the time and money to do a full renovation on our kitchen... I already have an idea file going with potential kitchens. I thought I would share some of my favorites!

 More cabinets hiding appliances. So slick!
 Another great kitchen. A curved cabinet on the end (dreamy!!). And that backsplash is amazing. You can have color and pattern and have a period feel without having to use subway tile. I am also a fan of the industrial stainless appliances. Sort of a compromise between a vintage stove and a comtempo-modern look. I think butcher block on the island is a perfect choice. I will definitely have a butcher block island to go with my soapstone counters.

 I love it when the cabinets have legs to make them look like furniture. I also like the open shelving on the end. Is that a fridge in the background? I love the way it looks like a giant old pie safe!
 This beauty is a 4 oven AGA gas cooker... just gorgeous. They make a 2 oven model, but as much as I bake, I am dreaming of the big boy! The ultimate in keeping a period look but having the modern conveniences. They come in many colors, but cream or black are my favorites. AGA also makes fridges and dishwashers in drawers. So cool!
 This is the greatest hood ever!!!


 I definitely want bin pulls for drawers, but I am torn between ice box or turn-style or slide-style latches.

I have an old Hoosier cabinet that I will always cherish. But for those without one, these Kitchen Dressers are amazing. They can even come with backets and a sink! My kitchen will definitely have an apron-front sink with the curtain below it.
This one, I love the white cabinets with the blue island. The blue island really pops in the middle there. I also love love love the curved island. I am also a big fan of glass cabinets and french wire, so the cabinet in the lower left there is soooo dreamy. I like the black countertops as well. I plan on using dark soapstone.

I love the dishwashers that look like cabinets. It is nice to blend technology in so that your ktichen still feels period. I am also a fan of the drawer-type dishwashers. Very cool!
More cabinets hiding appliances. So slick! Another great kitchen. A curved cabinet on the end (dreamy!!). And that backsplash is amazing. You can have color and pattern and have a period feel without having to use subway tile. I am also a fan of the industrial stainless appliances. Sort of a compromise between a vintage stove and a comtempo-modern look. I think butcher block on the island is a perfect choice. I will definitely have a butcher block island to go with my soapstone counters. This is one of my favorites. Imagine how hard it is to keep that shiny blue floor clean... but I love it!! More stainless and I love the industrial pendant light. Gorgeous!
I love it when the cabinets have legs to make them look like furniture. I also like the open shelving on the end. Is that a fridge in the background? I love the way it looks like a giant old pie safe! This beauty is a 4 oven AGA gas cooker... just gorgeous. They make a 2 oven model, but as much as I bake, I am dreaming of the big boy! The ultimate in keeping a period look but having the modern conveniences. They come in many colors, but cream or black are my favorites. AGA also makes fridges and dishwashers in drawers. So cool!This is the greatest hood ever!!! I definitely want bin pulls for drawers, but I am torn between ice box or turn-style or slide-style latches.I have an old Hoosier cabinet that I will always cherish. But for those without one, these Kitchen Dressers are amazing. They can even come with backets and a sink! My kitchen will definitely have an apron-front sink with the curtain below it.
Subscribe to:
Posts (Atom)