Showing posts with label living room. Show all posts

Saturday, April 2, 2011

the fireplace saga... we have shellac and cabinet doors!


Steven is wrapping up the work on the living room fireplace. He finished the amber shellac on the woodwork, installed the doors on the cabinets, and finished a bit of electrical work inside the cabinet. All that remains is a bit of quarter round, and the techno-geek work of installing the a/v components and such. He is very excited about the new receiver and researching speakers. I am just happy that we will be able to arrange the furniture properly soon!

Until the furniture is out of the way, it is rather difficult to get a nice picture of the fireplace. At nearly 9 month pregnant, I am not as nimble as I once was. But I did snap a couple pictures with my camera phone, just so you could see we are not slacking off here.

The strange little hardware you see to the left of the right-hand vent is a doorstop. This keeps our bedroom door from being swung into the cabinets by the little crazy people who live in our house.

I didn't want the entire area to scream "brand new built-ins!!!!" So I decided ice-box latches might add a little historical interest to the cabinets. I mean, of course they are new. We have a flat screen mounted above the fireplace. But still, I wanted it to fit in with the existing woodwork. And the custom-matched stain and amber shellac really do make a seamless match! I posted earlier about the metal mesh material we used for the door panels. This allows us to be able to hide the electronics but still use our remotes.


P.S. The nursery is actually finished as well... I just need to do some curtain hemming before I can take pictures!

Sunday, February 27, 2011

fireplace tile done!

Just a sneak peek at the fireplace. I managed to lay the tile last month (a challenge since I am getting more pregnant by the minute!). Steven was able to slap the sealer down and install the trim around the edges... I am quite pleased at how nice it turned out!


The fireplace screen was a Goodwill score. Steven snagged it for $8, and it had a Pottery Barn tag on it.


The edges look so nice and finished with the trim installed. Steven painted it with the flat black enamel from Bowie's bedroom furniture (which I haven't posted yet). Maybe someday we will get the floors refinished as there is water damage in the living room... but for now, I kind of like the spots. It gives it character. Or that is what people say who own old homes and can't get around to fixing everything right away!

Friday, October 1, 2010

oh, we've been busy....

Although I have not had a chance to do much in the way of blog (*cough*sorryaboutthat*cough*)... we have been busy at the Stone Cottage as usual.

We finished painting, staining and shellacking the shelves for the records. And started the tedious process of alphabetizing our collection... still not done...


Speaking for staining and shellacking. To get the stain color right, we had to take a piece of the old trim in to Sherwin Williams and had a color custom mixed. To get the yellow aged look of the shellac, we used Amber Shellac. And it is a super close match to the existing woodwork. Woot! Note: 3 year old Bowie loves Halloween and decorated the mantle all by himself. Future Design Star? Maybe not.


I wasn't digging the Ikea sconces we had put up. They looked too small for the giant fireplace. So I searched and searched for something that blended the line between modern and historic... and found these... I really think they look like a modern Edison-style fixture. And are a more suited to the scale of the fireplace, I think.


I did two coats of ebony stain on Bowie's floor, and a couple coats of clear matte polyurethane. Steven has the floor covered up and we are ready to spray the room down with primer! (Almost done!!!)


In the boys' bathroom, Steven finished the wiring. When I say wiring, I mean he had to install new outlets and fixture boxes, then run electrical from the second floor all the way down to the new breaker box in the basement. Sound like fun? Yeah... ask Steven how much he likes wiring right now!

I picked these plain (cheap) and I think, rather vintage looking, sconces from Home Depot for above the vintage medicine cabinet. Also, you can get a hint of the pale green paint in the bathroom. Think Vintage Spa!


And as if we did not have enough projects all ready... we started in on Emery's loft. See, Emery's room is much smaller than the other two bedrooms upstairs. We decided to give him some more space by tearing out the ceiling and creating a loft in the attic space.
First we had to deal with a strange boxed in area to the right of his windows. This boxed in corner was covering up the portion of the stairway that extends into his room. We decided to create bookcases and cabinet on either side of the window to conceal it. On the right side, the cabinets are not functional (since the stairway is behind it). On the left side, the doors swing open for use as a desk. Between the bookcases, there is a storage bench that I plan to upholster a comfy pillow for.


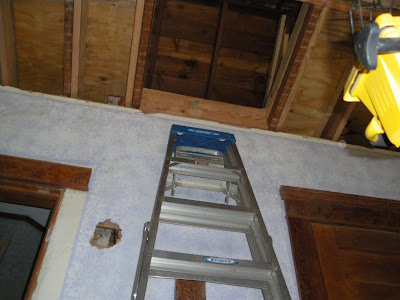
Looking up, you will see we tore out the ceiling. We extended the floor of the attic out a bit to create a "lip" for the loft... this is to give a bit more space and create an area for the ladder to go. (We are planning to use a built-in industrial ladder for loft access).
In the loft, to the right is an area that we plan to put a nightstand and a few small furnishings in. In order to tie in with the plaster walls below, I chose to use regular old house siding. After Steven redid the insulation, of course. It would be impossible to get drywall to look like ancient plaster... and this draws the eye up, I think. There will be trim separating the two where they meet.
This is the left side of the loft. Emery's bed will go on this side. The hole in the wall is where we are putting in access to the attic. (Someday we might need to get to all that electrical!) The boxed in part on the left is the chimney. I would have liked to put the sconce there, but there just was not enough room. It will be going over the attic access.
Here is the view from the loft... We scored antique balcony railing to use for the loft... can't have kiddos trying to parachute their way down or something. (Heaven knows they would try... boys!)


So, there is a little tour of our chaos. Once we get some projects buttoned up, I will be able to post some before and afters... until then, it is time to get messy with some paint!

Monday, July 12, 2010

fireplace re-do part seven: ready for stain

The fireplace is ready for staining! Steven finished all the painting. (Everything looks quite nice in our creamy white paint). I cannot even believe this is the same fireplace. I think the before and after for the finished product will be quite dramatic!


After running through several packages of sandpaper, the wood is ready to be conditioned, stained and sealed.


The brick of the fireplace was not intended to be visible... whoever laid the bricks slopped mortar everywhere. It was oozing through the bricks. Steven spent a lot of time with the grinder cleaning it up. The Dremel wouldn't even make a dent in it. He actually had to take our grinder to it... It was pretty crazy! He had to set up a board in the living room to keep the sparks contained. Our living room was coated in dust, so it was a pretty messy ordeal. But, a couple coats of primer and paint later, and we have this lovely brick fireplace:


Of course, every project we embark on hits a snag. The woodwork in our living room doesn't match. It has all aged differently... The doors and trim have gotten a lot of sunlight of the years and have faded to a medium brown:


While the beams on the ceiling, and the trim around the windows have remained a deep red-brown:

So we are doing a few different test pieces for comparison. I think that the pocket door is the biggest area of woodwork and the doors are nearest the fireplace, so we should match those. We will try 3 different options: a deep red, a medium brown, and a medium brown mix with red.

Old houses keep us creative, right?

Monday, May 31, 2010

fireplace re-do part six: the problem with the sconces

I am happy to report that the work is closing on the fireplace re-do. Steven has finished painting the wood. He is getting ready to clean up the bricks & mortar, which entails a lot of quality time with a grinder and flap wheel. Once that is all smoothed out, he can prime and paint to match the wood. After that, just staining remains.

He finished the wiring, added outlets for electrical, cable and HDMI, as well as installing the sconces.

The sconces... ugh. Now, don't get me wrong. I LOVE the sconces. They look rather lovely here:

The troubles don't start until we light them up... Don't see the problem?


How about a close up? Right one:


Left one:


Apparently, some of the sconces have flowers etched into the globe, and some don't. I didn't realize this when I bought them. The problem is, I got them from IKEA when I was on a project in Sacramento. My assignment now is no where near an IKEA. The closest one to my house is in Chicago. (I live in Kansas).
Yeah. We are kind of hosed. If anyone is going to IKEA and could pick up another sconce (with the floral etched shade), I would be happy to Paypal you!!!
Until then, we have mismatched sconces, which is sort of a bummer.

Wednesday, May 12, 2010

fireplace re-do part five: TV cubby and cabinet doors

The construction phase of the living room is complete! Now we have a ton of sanding, painting, staining and wiring. (With just a smidge of plaster and trim repair).

We put the TV in for a test fit, and I couldn't resist snapping a picture... Sorry the lamp is blocking the right-hand side. It is chaos now, trying to keep the new furniture from being covered in sawdust and paint. The TV fits snug as a bug:

We used a tilting mount bracket for the flat panel TV, so we can fine-tune the viewing angle later on. It really is a big fireplace -- look how it dwarfs that step ladder!

Also, the doors were built and installed on the cabinets. (Note that the ice box latches have not been installed yet. We were just fitting everything up. We have to take them off anyway to paint).
Since the doors don't have a solid center to keep them sturdy, we will need to work a bit harder to keep our doors square. Even just the added weight of the paint can send them crooked. We will be installed some magnets to help, but we expect that we might need to make minor adjustments in the future. We are willing to accept the trade-off since we want remotes to work for the components we will store inside.

About that screen material... I have gotten a few questions about the metal material on the doors. The pieces are flat aluminum panels -- they are sold in varying sizes but plan to cut them down dor a custom look. I bought them at Home Depot, they are sold at a few places online. (Google: Steelmaster aluminum sheets.) We picked the pattern called "Lincane" since it looks like old speaker grill. They have a few other really nice patterns as well. We chose black, but it also comes in brass and nickel.

http://www.homedepot.com/h_d1/N-5yc1vZ1xjl/R-100249610/h_d2/ProductDisplay?langId=-1&storeId=10051&catalogId=10053

Here is an inside shot of a door. The doors are simply mitered 1 x 2s.

I picked up a sample of the new wall color today. It's one of the new Martha Stewart colors at Home Depot. I can't wait to check out the quality of the paint. Added bonus: it's low-VOC paint!

Thursday, May 6, 2010

fireplace re-do part four: the chunky mantel

I couldn't help myself... I just had to see what the shelves and fireplace would look like with some paint. So, after taping the shelves (they will be stained), we slapped a coat of Kilz primer and two coats of Benjamin Moore's "Collection's Item" on the record shelves. The color is a bit more creamy than the picture shows. More like the back of the cabinet color. I really like the color and am eager to see the project done!

In the last post, you saw the framing go up. Next the OSB went up:


And then tongue-and-groove pine planks. With the custom cabinets and shelves, the tongue-and-groove is a bit dressier than sheets of beadboard paneling. I can't afford to do a whole room in it, but just a fireplace is within the budget:


For a finishing touch, we chose 1x2s to cover the seams all the way around:


The mantel is much more chunky now! More layers of molding were added until we got the beefcake look that we wanted:


And here is where we are at now:

Next up, cabinet doors, finishing the TV built-in, pointing the grout and paint-a-rama.

Friday, April 30, 2010

fireplace re-do part three: record shelves

Some bloggers chose to reveal the project at the very end with a big TA - DA!!! But because we believe in DIY and showing how you can tackle things, I like to show incremental progress.

That said, here is where the living room fireplace is now:


The record cases are installed on top of the cabinet. (Each shelf holds 150 records, times 12 shelves.) The mantel work has begun. And the framing for the chimney is started. (The rectangle in the middle is where the TV will go).

We had theorized that the beams looked like they were detaching from the ceiling... this proved to be true. The beams were reattached and a few missing trim pieces will be replaced:


The top of the record case will be trimmed out a bit. The top was notched out to accomodate our existing crown molding. This will look so nice when finished out. I decided to stain all the shelves and paint the rest:

Here is the beginning of the mantel. This mantel is being built up in layers with different decorative molding pieces. It has a ways to go, but I think it will look great when done. It will actually get a few more layers. I decided a big chunky mantel was needed since the chimney was so tall. A small mantel wouldn't have stood out:


Next up, making the cabinet doors. We will be using 1 x 2s and some decorative metal sheets. Instead of knobs, I ordered ice box latches for a period look.

The top of the chimney will be covered in planks, TV bracket installed, wiring ran, sconces installed, wood filling, sanding, painting, etc etc etc...

Stay tuned...

Sunday, April 18, 2010

fireplace re-do part two: custom cabinets

For the fireplace, I know vaguely what I want... Cabinets to store components in, as well as board games and such. Shelves that go all the way to the ceiling for our record collection. Cleaning up and painting the brickwork. Creating a mantle. Boxing in the chimney with planks, and creating a built-in for the flat panel TV.

I didn't do any detailed drawings. I wasn't sure how the angles and lines would come together... so we are flying by the seat of our pants on this one.

This is the space for the cabinet and shelves:

Yesterday, the cabinet was built. Stock cabinets at the hardware store didn't have the right dimensions, and we didn't want to have to cobble something together. Custom was the only way to go, in this case. My requirements were simple -- it couldn't have a toekick, because early cabinets went straight to the floor without a kick space. It needed to include two functional vents (just like we did in Bowie's room), since there was an existing vent there.

So here is what we have so far: (Obviously, doors are yet to come).

To make the shelves a bit chunkier, decorative molding was added:

I really am a sucker for a mitered corner. The counter of the cabinet wraps around into the fireplace. It makes for a nice finishing touch:


I ordered icebox latches for the doors. Also, the doors will not be solid wood. Since we are using the space for components and will want the remotes to work, I chose decorative metal screens for the centers of the doors.
I plan on painting the cabinet the same color as the fireplace bricks and staining the counter top to much the trim in living room.

Thursday, April 15, 2010

Pottery Barn tables... for half the price!

With the fireplace work in full swing, demo and dust everywhere... it is the perfect time to buy furniture, right?

Let's just say I get a little impatient.

I am on the look out for accent chairs -- preferably in the pink persuasion... But am still honing in. Our new Chloe sofas should be arriving this weekend. But what I really wanted to share with you is another bargain find!

This is the "Rhys Side Table" from Pottery Barn, for $399:


I ordered the "Norwich Two Drawer Side Table" from Overstock for $182.99:

Two tables for the price of one? Hells yeah! Also, Overstock has knock offs of the media, console and coffee tables. After assembling them, and having to move them around, Steven can assure you they are heavy duty! Very heavy. After studying the ones at PB and these, the only difference I see if the little label holder on the PB ones. And you can pick up label holders for a couple bucks online.

Tuesday, April 13, 2010

fireplace re-do part one


We are all about child labor here at the Cottage of Stone. When you find adult contractors that will work for milk and cookies, let us know!

Seriously, our kids actually ask to help out on our house projects, so we try to include them whenever we can. Because Bowie's room and the dining room are half-way done, I felt it was a logical time to start tearing apart the living room again. (What!?!) I don't know... I just get brilliant ideas that don't always follow a great timeline...

Since Bowie (and his crib, toys, chairs, etc) will be vacating the living room soon, I wanted to take the opportunity to get the living room presentable. Nothing like having to apologize to guests every time someone new comes over. (Sorry about the mess, we are renovating every single room in our house at the same time!!!)

We knew that we wanted to put shelves in the living room to organize our large vinyl record collection. And the fireplace has been sitting half-way demoed for over a year. So it was time to kick it in gear again.

Here is what we started with:


I never understood why they put up the ugly paneled wall. So much space wasted. And I do not miss the lighthouse wallpaper!

Pulling out the boxed-in wall and cheap-o mantel (we put it for free on Craigslist) and some paint left us with this:


I am not a fan of the brass doors. So out they came:


Looking better, but we are not even close yet...


Cleaning out the ashes and grates revealed a neat trapdoor in the fireplace. This dumps down to the massive clean-out in the basement.


We wanted to salvage the granite and donate it to Habitat ReStore, but it wouldn't come off in one piece. Steven had to pry it off in pieces.


Emery helped Steven remove the side pieces.


I think even this is a massive improvement!


Next comes up the floor piece. Steven used a prybar...


While I used a hammer to break it up...


Which left us with this:


Which will lead to some of this:


Stay tuned!